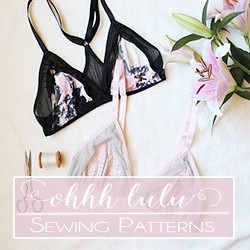
Introducing the Amber Halter Bra

Wednesday, July 13, 2016


The Amber Bra Pattern has quickly become my new go-to bra pattern. It is really quick to cut - literally only 2 pieces - and takes just a small amount of fabric. But the best thing about it is how versatile it is. It makes the perfect base for a swim or yoga top (which you will see soon!)


The Amber Pattern comes with instructions detailing how to sew the bra with a low neckline or high neckline, with scalloped lace detail. It features a long wrap band, inspired by the Kestos Bras of the 1920's and '30's.

This is a fairly easy sew, with an easy fit. There are bust seams that can be easily taken in or let out for more generous figure. Stay tune for some pattern hack's for this one!

Purchases it HERE or on Etsy!

I'm moving (websites)


I started this blog in 2009 (I think). The internet has changed a lot since then. Updating my website to one that I could integrate with a shop with easier customization has been on my to-do list for the last year. I finally made the leap and am moving over to a wordpress site. This has been a huge learning curve for me, but I think this new site will be easier to manage and more fun to visit.

You will find my new site at www.ohhhlululingerie.com. I'll begin redirecting ohhhlulu.com soon (literally as soon as I figure out how to do it! ha!).


The new site has an easier to navigate Tutorials Page.  I'm always surprised to find how many people still don't know about my extended tutorials! So, I hope this is helpful.

I'm also slowly stocking a Pattern Shop there (no lingerie yet, sorry). With last week's Etsy Payment Processing debacle, I realized I really need to have a standalone site. So, here it comes!


It's my Birthday!

Thursday, June 30, 2016


I'm celebrating my birthday with a SALE! Receive 15% off when you use coupon code HappyBirthday. Expires at midnight on July 4.
Due to a possible Canada Post strike there may be a delay in shipping sleep masks!


I'm super excited about my birthday this year. My birthday falls on Canada Day, our equivalent to the Fourth of July, so there are always lots of festivities. There is a parade that goes right by our house, and lots of other fun things to do. It's nice to feel like the whole country is celebrating along with you! Isabel has even been practicing singing Happy Birthday.

I know this is a long weekend for many of you. I hope all of my Canadian friends have a wonderful Canada Day and that my friends to the south enjoy their Fourth of July!

This silence has been brought to you by Anxiety

Tuesday, June 28, 2016

I've been distant. Quiet. I know.

The truth is I've been going through something. All my life I've been considered a "worrier." If you were to ask any of my friends, they'd probably say I have a lot of stress, much of it self imposed, and kind of on the irrational (ok, crazy)  side. I've been finding over the last couple of years,  culminating in the last several months, that my anxiety levels have been getting to a point that is crippling.

All of my life I've believed that if I just powered through, kept moving, I could get past the uncomfortable feelings. I recently came to the quiet revelation that I've been doing mental health all wrong and that maybe my constant feeling of dread and worry wasn't normal, especially when things are generally ok.


The turning point for me was releasing this last pattern collection. I've been so worried that things aren't good enough, that people will be disappointed, that something is wrong, that I've been terrified to write about them. I need to work on a new collection for my lingerie shop, which is looking rather ragged, but I have the feeling that nothing will ever be good enough.  I open my email with dread and some days can't even bring myself to check because I'm afraid that something is wrong. I have no reason to feel this way. I am a good designer. I've worked hard to build a fairly successful business.

Thinking about these feelings made me realize how afraid I was for Isabel, and my compulsive need to make sure she is ok. My irrational worries that she will get out of her crib, through her locked door, past the baby gate, down the stairs, out of our locked house, and come to some terrible end out in the world. It's a terrible feeling to constantly have with you.

Since buying this new house, my anxiety has shot through the roof. I feel like there is a lot of "unknown" which is really terrifying for me. I have constant stress over finances when I really don't need to. I have constant stress over the state of our house, when reality is I live in a beautiful old home that much of the major work has been completed. When I sit and think rationally about my anxieties, none of them make sense, but I just can't stop. I almost constantly have that tight feeling in my chest, like the way you feel before writing a big test that you're not quite prepared for. I wake up this way, and when I do fall asleep, I have stressful dreams.

Mix all this with an unhealthy dose of intrusive thoughts, and I decided that maybe something wasn't firing quite right and that I needed some help. As someone who DIY's everything, saying this was a big step is a bit of an understatement.

I always thought my Anxiety was a mixed blessing. Sure, it stopped me from sleeping or actually getting to know any of the many amazing people in my life, but it compelled me to work, work, work! In hindsight, none of my best work has been done in periods of high anxiety. It's not a good motivator and it's definitely not good for business. In fact, it's been crippling my business over the last few months.

So, I'm trying something new. I've been doing self care things for months, like exercise, but it hasn't been cutting it. I've been getting a lot of new insight into the way I think over the last week and it's really been a revelation. I've started on some medication, picked up yoga again, started a "worry journal" (which sounds lame but feels helpful),  have enrolled in some support groups and hopefully will have some one-on-one care soon. Unfortunately, there is a wait list for mental health care in our area, so that has been frustrating for me, but it feels good to be getting help.

I wanted to write this to explain a little to you what's been going on with me. I haven't been myself for a while now. I've always wanted this blog to be a place where I can share real life: it's good times and it's not so good times...  I hate that persona that people put online where thing are 100% perfect 100% of the time #bestlife #blessed. Reaching out for help was extremely difficult for me, and I want anyone know is going through something similar to know it's ok! We would never judge a friend who is going through these things, so I don't know why we judge ourselves so harshly.

Thanks for listening, and mostly, thanks for caring about me. If anyone has any similar experiences, I'd love to hear.

Introducing... The Ultimate Sleep Mask Pattern

Sunday, June 5, 2016


Sleep masks are something that I added to my Lingerie Shop a couple years ago. Over the years, I like to think I've perfected my technique and learned a thing or two about how to put a nice mask together. Sleep Masks are something that I have a lot of fun sewing. I like taking a basic pattern and figuring out small changes I can make to turn it into something really unique.

You might remember me talking (or ranting on twitter) about my battles with some pretty hardcore insomnia over the years. Whenever I feel a bout of sleeplessness coming on, I thrown on my favourite sleep mask. Something about the ritual of putting it on helps put me in the mindset for sleep. Well, that and Sleep With Me Podcast (a serious life saver). So, I can truly say that these are personally tried and tested (and loved).


I wanted to add a few patterns to my Pattern Shop that would be more suitable for people who are just learning how to sew. The Ultimate Sleep Mask Pattern does require you to have some basic sewing skills, like how to use a sewing pattern, how to cut fabric, and the basics of how to sew a seam, but other than that, it is a great starting point! 


My Sleep Mask Pattern makes use of materials and supplies you can find at almost any sewing shop. You may even be able to get everything you need at your local craft store! It just takes a small amount of fabric, (a fat quarter will do!), some cotton for lining, cotton quilt batting, and a strip of any type of elastic (though I like to use Fold Over Elastic). One of my pattern testers even suggested using long ribbons for ties. I've done something similar on one of my Silk Sleep Masks.


The Ultimate Sleep Mask Pattern allows you to make a basic mask, with tips on using lightweight fabrics like satin, a mask with sleep-eye embroidery, or cute little animal masks in the shape of a kitty, bear, fox, and bunny. I already have plans on a quick and easy tutorial on how to make a Panda mask! I've even had the idea of cutting little eye holes to make fun costume masks for kids.


I've spent a lot of time and attention on providing some extra in-depth photos for this latest collection of patterns. I have tried to make my instruction manuals both useful and beautiful! I really hope you enjoy sewing this pattern. I think it's something a little different (and also makes a great handmade gift! I'm currently in the process of making a batch out of some heirloom fabric for a friend).


Sweet Dreams!

It's finally here... (almost)

Friday, June 3, 2016


It's here! It's pretty much here! I've drafted, tested, graded, trued, sewed samples, tested, received feedback, edited and edited and edited, photographed, and edited some more... but it's here (basically). I've listed all but one of my new patterns in my Etsy Shop.

I'll be adding one final pattern next week. It just needs one little tweak. I just couldn't wait any longer. I am impatient.

Last Tuesday I did a really fun photoshoot with my beautiful friend/cousin, who modelled for me, and my friend Susie.  It was my first time photographing a model, and to make my life extra challenging, I decided I wanted a diffuse back lighting.  I'm excited to show you my new things! I'll be posting about them piece by piece, but in the mean time, feel free to shop the collection HERE.

Pattern Testers Needed

Thursday, May 19, 2016

Update: I've received so many offers to help test my patterns! Thank you all so much. I'll be contacting testers over the following days. I apologize in advance if I don't get back to you specifically. I've been overwhelmed by the response! Thank you!

I'm so close to being finished my 2016 Pattern Collection. Holy Smokes have I learned a lot over the last few years.


As you may know, I studied fashion design at school and I learned a lot. However, the two things I did not learn was lingerie-making and computerized drafting!!! The lingerie-making I was able to pick up on my own over years of trial and error. The computing side of thing... that has involved a huge learning curve for me. I am still learning every day. I guess the point of my rambling is that no matter how knowledgeable or skilled you are, it's ok to not know everything! It's ok to be a total newbie. We're all newbie's at something. My venture into Digital Pattern Making has been a huge learning experience for me. I still have a lot to learn!

With each pattern collection I feel like I improve so much. Now I want to go back and re-edit all of my old patterns. I really want to thank all of you for your input over the years. I seriously take it all in - the good and the bad - and try to be better with each pattern release. I was super excited to collaborate with another pattern maker on one of my more complex patterns (hint: it has an underwire). I've incorporated a lot of new things in these patterns and really tried to reach outside of my comfort zone!

Right now I'm looking for a few people to test out my new collection of patterns before they are released.

Here is what I'm looking for:
1. Intermediate sewing skill with experience sewing lingerie.
2. Easy access to lingerie sewing supplies - underwire, casings, elastics, etc.
3. Pretty photos of your finished garments that you don't mind me sharing. These don't have to be professional photoshoots, but well lit and tastefully styled.

And Here's what I need know from you:
1. Were there any grammatical /typos/ spelling errors in the pattern instructions or on the pattern itself?
2. Did the patter print and assemble properly?
3. Were you able to follow the instructions to complete the garment?
4. Did you have any major assembly issues?

I'm also looking for a variety of sizes. For reference, you can check out my size chart below. I've added an extra size for my new collection of patterns.


Bust
Waist
Hips
Extra Small
34-35” (86-89cm)
24-25” (61-64cm)
33-34” (84-86cm)
Small
36-37” (91-94cm)
26-27” (66-69cm)
35-36” (89-91cm)
Medium
38-39” (96-99cm)
28-29” (71-74cm)
37-38” (94-97cm)
Large
40-41” (101-104cm)
30-31”(76-79cm)
39-40” (99-102cm)
X  Large
42-43” (106-109cm)
32-33” (81-84cm)
41-42” (107-107cm)
XX Large
44-45” (111-115cm)
34-35” (86-89cm)
43-44” (109-112cm)

If this sounds like a task you're up to, please send me an email or comment here. I'll be sending out patterns in the next few days/weeks. I have several patterns that need testing and will give you your choice of style.

How I join my fold over elastic

Wednesday, May 18, 2016


This is something I've been wanting to post for a while! This is how I sew my FOE into a continuous loop. I've posted a video on my YouTube channel, but I know it can be hard to see exactly what I am doing... so, I hope this is helpful!

First, I cut the end of my elastic so that it overlaps my start-point by about 1/2" (keeping the same amount of tension on the elastic as you have done over the rest of your opening). I fold the raw end under by about 1/4".


Stitch right to the edge of the fold and lower your needle into the elastic. Raise the foot and pivot your garment so that the you can now zig-zag stitch over your folded edge, creating a nicely finished join. Backtack at the end of your stitching.


After that, just trim back any excess elastic on the wrong side and away you go! This area tends to get bulky so you may need to help it through your machine a little - I know my machine sometimes gets a little caught up on the bump that the join creates.

I hope this is helpful! Pretty much all of my patterns use Fold Over Elastic for edging. I like to use it because it comes in a million different colours, so it's easy to match with almost any fabric, but it can be tricky to finish.

Happy Sewing!


How to sew knit fabric without using a serger.

Monday, May 16, 2016


I sewed without a serger for years. Now that I have one (two actually) I feel like I couldn't live without it, but that doesn't mean you can't create beautifully finished garments without one.  I'm going to go over a few different stitches that most sewing machines will have that will allow you to sew seams in knit fabrics that stretch!

I sew on a Pfaff Select 150. It is a an entry level Pfaff, fairly basic with no computerizations, but like many machines, it comes with a variety of machines for sewing knits. The ones I use most often are a basic Zig-Zag Stitch (pretty much every domestic sewing machine will have this option), a Stretch Stitch, and an Overlock Stitch.  My previous machines, a 1970's Singer and a vintage blue Elna with discs that changed the stitches, all had these types of stitches.  


The zig-zag stitch is the most important of all of the stitches, especially for sewing lingerie. My Pfaff allows for great customization in the width and length of the stitch which is something I find very useful for lingerie sewing. For sewing seams on 4-way stretch fabrics, I opt for a narrow zig zag.  Using the narrow zig zag stitch allows you to sew your seam just as you would if you were using a zig-zag stitch.


The next stitch I want to mention is the Overlock Stitch. This stitch combines a straight stitch with a wide zig-zag stitch and looks kind of like the blind hem stitch. Before I got my serger, I liked to use it to finish raw edges after sewing my seams with a zig-zag stitch.

Zig-zag stitched seam with faux-overlocked edge
Using the Overlock stitch is easy, though can be a little slow because the machine has to do some fancy maneuvering.  Simply stitch so that the zig-zag segment of the stitch wraps over the raw edge of your fabric.  I find that this seam finish works best of sturdier knits, like cotton-lycra jersey. Lighter rayon jersey knits tend to roll a bit more for me.

Using the Overlock Stitch to finish raw edges.


The last stitch I wanted to mention is the Stretch Stitch (or at least that's what I call it). It creates a very stretchy seam, but on my machine, is pretty slow going because of the complexity of the stitch.  When I've used this stitch in the past, I've simply trimmed my seam allowance right back without any extra seam finish.


 If you are new to sewing knits, spend some time getting to know the different stitches on your machine. There are so many options for sewing stretch seams and finishing edges without having to use a serger. These are just a few options, and I hope you find them useful!


Blog Design by Nudge Media Design | Powered by Blogger